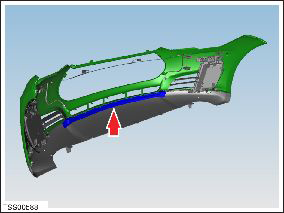
Tesla Model S: Chin Spoiler Assembly (Remove and Replace)
Tesla Model S (2012-2026) Service Manual / Body / Chin Spoiler Assembly (Remove and Replace)
Warning: If the vehicle has air suspension, activate "Jack" mode on the touchscreen before raising and supporting the vehicle. Removal
- Remove the front fascia refer to procedure.
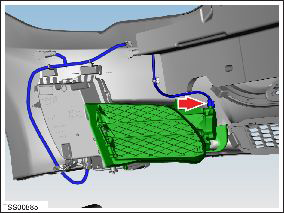
- Remove the ankle catcher foam, if equipped.
- Disconnect the motorized vent harness connectors from the LH and
RH vents.
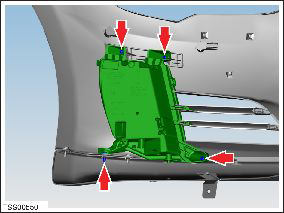
- Remove the screws (x3) that secure the vent to the fog lamp and
front fascia assembly (torque 1 Nm), then remove the vents.
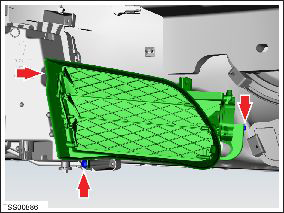
- Disconnect the electrical harness from the LH and RH fog lamps.
- Remove the fasteners (x4) that secure the fog lamps to the
vehicle, then remove the the fog lights.
- Remove the screws (x2) that secure the chin spoiler to the fascia.
- Release the clips (x13) that secure the chin spoiler to the
front fascia.
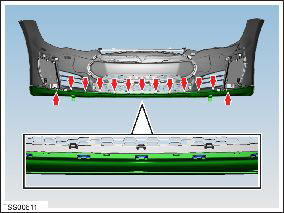
- Remove the chin spoiler from the fascia.
READ NEXT:
 Fascia Assembly - Rear (Remove and Install)
Warning: If the vehicle has air suspension, activate "Jack"
mode on the touchscreen before raising and supporting the vehicle.
Removal
Position the vehicle in preparation for rai
Fascia Assembly - Rear (Remove and Replace)
Removal
Remove the rear fascia for access (refer to procedure).
Remove the bolts (x4) and plastic rivets (x2) that secure the
diffuser tray to the rear fascia (torque 3 Nm).
Relea
Bumper Assembly - Rear (Remove and Replace)
Removal
Remove the rear fascia assembly for access (refer to procedure).
Remove the bolts (x8) that secure the bumper to the body (torque
52 Nm).
SEE MORE:
Remove Front Drive Unit
Position the support jack on top of the front
crossmember and secure the 2 screws to the front crossmember.
The support jack mounts to the bolt holes on top of the front
crossmember that secured the coolant reservoir.
TPMS - Set Thresholds
Note: This procedure
only applies to vehicles with the Baolong TPMS system (vehicles
built before approximately September 10, 2014).
Set thresholds
In the Service Manual, refer to
General Information > Technical Data > Tire pressures. Note the
appropriate hard a
© 2019-2026 Copyright www.tesms.org
