Tesla Model S: Glass - Door Mirror - LH (Remove and Replace)
Warning: To avoid personal injury, eye protection must be worn when performing this operation.
Warning: To avoid personal injury, wear cut-resistant gloves when performing this operation.
Removal
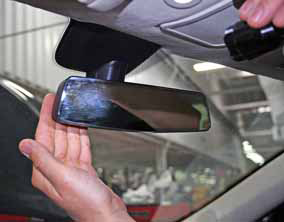
- Carefully push the inboard side of the door mirror glass into
the assembly.
Caution: Take care not to damage component(s).
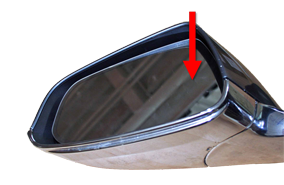
- Working from the outboard side of the glass, carefully use a
broad plastic trim tool to release the clips (x8) that secure the
glass to the assembly.
Caution: Take care not to damage component(s).
Note: The door mirror glass cannot be removed from the assembly at this point.

- If the vehicle is equipped with electrochromatic mirrors,
perform the following steps:
- Disconnect the heater harnesses (x2).
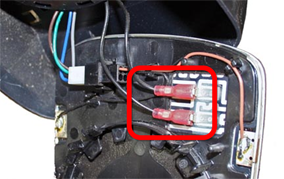
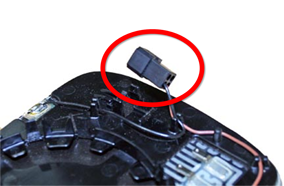
- Disconnect the dimming harness.
Caution: Take care not to damage component(s).
- Disconnect the heater harnesses (x2).
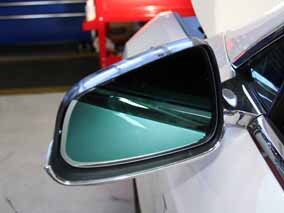
- Release the door mirror glass from the assembly.
If the vehicle is not equipped with electrochromatic mirrors: Installation procedure is the reverse of removal.
If the vehicle is equipped with electrochromatic mirrors, perform the following steps:
- Inspect the soldering on the heater and dimmer connections to
make sure they are intact (below, highlighted yellow).
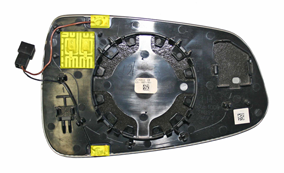
- Reconnect the harnesses.
- Adjust the mirror motor so that it is in the center position.
- Align the clips on the back of the door mirror glass with the mirror assembly and carefully press the glass into place until it is fully secured. Caution: Do not pinch the wires when replacing the glass. Caution: Take care not to damage component(s).
- Perform a functional inspection of the auto dimming feature.
- Sit in the driver's seat and press the brake pedal.
- Use a towel or a hand to block the light sensor.
- Aim a flashlight at the rear view mirror.
- Check both side mirrors after 5 seconds to make sure that
they dim.
- Perform a functional inspection of the heating feature.
- Use the touchscreen to turn the defrost on HI.
- Wait for 1 minute.
- Touch the door mirror glass to make sure that it is warmer than the ambient temperature.
READ NEXT:
 'B' Post Trim Panel - LH (Remove and Replace)
Removal
Open both LH doors.
Remove clips (x2) securing 'B' post finisher to body.
Caution: Protect exterior paint surfaces during this
procedure.
Brightwork - Body side - LH (Remove and Replace)
Removal
Release the top of the front and rear door seals.
Note: Components have been removed in this graphic
to aid clarity.
Note: The following image shows th
Rocker Panel - LH (Remove and Replace)
Removal
Remove the plastic rivets (x2) that secure the trailing edge of
the front wheel arch liner to the rocker panel finisher.
SEE MORE:
SD Card - Media Control Unit (Remove and Replace)
Note: This procedure only applies to MCU/touch screens
that are revision E or later.
Removal
Remove the MCU/touch screen (refer to procedure).
Working from the top of the MCU/touch screen, carefully use a
plastic trim tool to press the SD card retaining tab away from th
Hose - Front HVAC - Drain (Dual Motor) (Remove and Replace)
Remove
Perform the electrical isolation procedure (refer to procedure).
Remove the RH steering brace:
Remove the bolt that secures the steering brace to
the subframe (torque 26 Nm).
