Tesla Model S: Frame - Seat Back - 2nd Row Seat - RH (Remove and Replace)
Tesla Model S (2012-2026) Service Manual / Seats / Frame - Seat Back - 2nd Row Seat - RH (Remove and Replace)
Removal
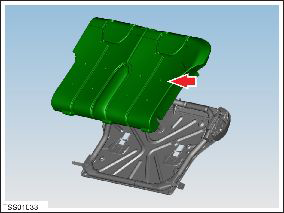
- Remove Rear RH seat back rest assembly and remove Pivot lock from outboard side of assembly (refer to procedure)
- Release and remove latch cover from seat back.

- Release cover from seat back frame.
- Remove cover and foam assembly from frame.
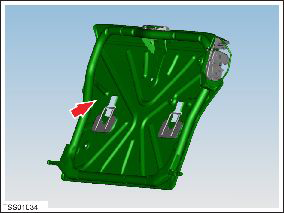
- Remove frame.
READ NEXT:
 Base Assembly - Front Passenger's Seat (Remove and Replace)
Removal
Remove the passenger's seat assembly (refer to procedure).
Place the seat on a clean work surface.
Remove the screws (x2) that secure the inner side cover to the
seat (tor
Bolster - Side - Seat - 2nd Row - LH (Remove and Replace)
Removal
Fully open the LH rear door.
Release the LH rear seat back rest lock and push the rear seat
back rest flat for access.
Insert a wedge tool behind the bolster to provide ou
Striker - Seat back - 2nd Row Seat - LH (Remove and Replace)
Removal
Remove rear trunk side trim (refer to procedure)
Remove rear sill trim panel (refer to procedure)
Remove screws (x2) securing striker to body (torque 17 Nm).
SEE MORE:
Steering Rack (Dual Motor) (Remove and Replace)
Warning: If the vehicle has air suspension, activate "Jack"
mode on the touchscreen before raising and supporting the vehicle.
Removal
Remove the front subframe (refer to procedure).
Remove the bolts (x2) that secure the steering rack assembly to
the subframe (torque 17
Heater - PTC (Dual Motor) (RHD) (Remove and Replace)
Warning: Only technicians who have been trained in High
Voltage Awareness are permitted to perform this procedure. Proper
personal protective equipment (PPE) and insulating HV gloves with a
minimum rating of class 00 (500V) must be worn any time a high
voltage cable is handled. Refer
© 2019-2026 Copyright www.tesms.org
