Tesla Model S: Hub - Front - LH (Remove and Replace)
Special tool(s) required for this procedure:
| Supplier | Part Number | Description |
| Tesla | 1062500-00-A | Magnetic Field Viewing Card |
| Tesla | 1082171-00-A | S-hook |
Removal
- Dual Motor vehicles: Remove the center cap from
the front LH wheel and loosen the axle nut.
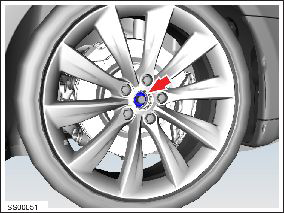
- Remove the road wheel (refer to procedure).
- Using a suitable tool, ease the caliper pistons and brake pads away from the rotor.
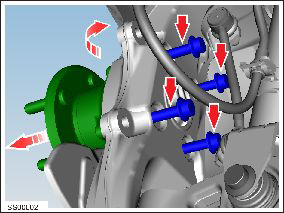
- Remove the bolts (x2) that secure the caliper to the knuckle
(torque 120 Nm).
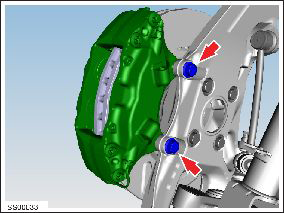
- Release the caliper and use the S-hook to support it. Caution: To avoid damage to the brake line, the brake caliper must be supported at all times.
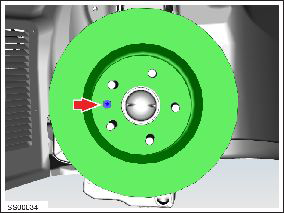
- Remove the bolt that secures the rotor to the hub (torque 17 Nm).
- Remove the rotor.
- Dual Motor vehicles: Remove and discard the axle nut and wedge-lock washer (torque 205 Nm). Caution: Ensure that a new axle nut and washer are installed during installation.
- Dual Motor vehicles: Use a suitable tool to partially remove the axle shaft from the hub.
- Remove the bolts (x4) that secure the hub to the knuckle (torque
90 Nm).
Caution: If the vehice is dual motor, take care not to damage the axle boot.
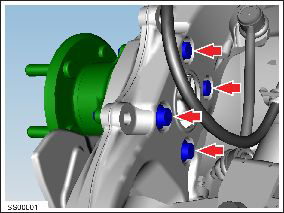
- Rotate the knuckle and release the bolts.
Caution: If the vehice is dual motor, take care not to damage the axle boot.
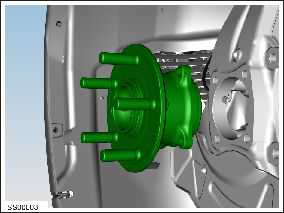
- Remove the front hub assembly and place it on a non-magnetic
surface.
Caution: A magnetic field from a pick-up tool or magnetic parts tray could permanently damage the magnetic pattern on the hub/bearing tone ring.
Installation procedure is the reverse of removal, except for the following:
Note: Clean the affected areas before installation.
Warning: Only use cleaning agents and solvents in a well-ventilated area.
Caution: Tighten bolts evenly using a diagonal sequence.
Use the magnetic field viewing card to ensure that the magnetic field on the tone ring is not damaged.
Pump the brake pedal at least 5 times to seat the brake pads against the rotors.Warning: Always check that the brake pads are seated correctly before driving the vehicle.
Dual Motor vehicles: Install a new axle nut and washer.
READ NEXT:
 Link - Sway Bar - Front - LH (Remove and Replace)
Warning: If the vehicle has air suspension,
activate "Jack" mode on the touchscreen before raising and
supporting the vehicle.
Removal
Loosen the front LH lug nuts (torque 175 Nm
Sway Bar - Front (RWD) (Remove and Replace)
Warning: If the vehicle has air suspension, activate "Jack"
mode on the touchscreen before raising and supporting the vehicle.
Removal
Remove the underhood storage unit (refer to
Sway Bar - Front (Dual Motor) (Remove and Replace)
Warning: If the vehicle has air suspension, activate "Jack"
mode on the touchscreen before raising and supporting the vehicle.
Warning: If the 12V power supply is disconnected, do
not att
SEE MORE:
Back Rest Assembly - Seat - 2nd Row - RH (Remove and Install)
Removal
Remove RH rear seat bolster (refer to procedure)
Use a pry tool to release the grommet that secures the RH 2nd
row backrest.
Pull up on the RH backrest, then pull it outwards to disconnect
it from the LH
Hub - Rear - LH (Remove and Replace)
Special tool(s) required for this procedure:
Supplier
Part Number
Description
Tesla
1062500-00-A
Magnetic Field Viewing Card
Tesla
1082171-00-A
S-hook
Warning: If
