Tesla Model S: TXV Valve - Chiller (Remove and Replace)
Tesla Model S (2012-2026) Service Manual / Thermal Management / TXV Valve - Chiller (Remove and Replace)
Removal
- Recover refrigerant from the vehicle (refer to procedure).
- Remove the front skid plate (refer to procedure).
- Remove the nut that secures the pipe retaining plate to the TXV
(torque 12 Nm).
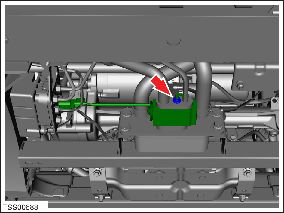
- Disconnect the refrigerant pipes from the TXV. Caution: Plug pipe connections to prevent ingress of moisture or dirt. Caution: Remove and discard O-rings.
- Disconnect the TXV solenoid valve connector.
- Remove the bolts (x2) that secure the TXV to the battery chiller
(torque 6 Nm).
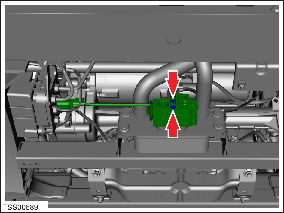
- Remove the TXV from the battery chiller.
- Installation procedure is the reverse of removal, except for the following:
- Replace the A/C pipe O-rings. Caution: Lubricate new O-rings with clean refrigerant oil.
- Replace the battery chiller O-rings.
- If the new TXV does not have a solenoid, install a coolant valve dummy plug on the vehicle-side electrical harness connector.
READ NEXT:
 Pressure Transducer - Low Pressure (Remove and Replace)
Removal
Recover refrigerant from the vehicle (refer to procedure).
Remove the underhood storage unit (refer to procedure).
Disconnect the electrical connector from the pressure
tr
Battery Chiller and TXV Assembly (Remove and Replace)
Warning: If the 12V power supply is disconnected, do
not attempt to open any doors with door glass in closed position.
Failure to follow this instruction could result in door glass
shat
Cooling System - Partial Refill and Bleed
Refill
Caution: Use the specified coolant only. In this manual, refer
to General Information > Capacities, Fluids, and Lubricants >
Fluids.
Remove the coolant reservoir cap (r
SEE MORE:
Adjacent Lane Speed
NOTE: Depending on market region, vehicle
configuration, options purchased, and software version,
your vehicle may not be equipped with Adjacent Lane
Speed, or the feature may not operate exactly as
described.
When moving significantly faster than vehicles in
adjacent lanes, Model S automatical
Brake Pedal (Remove and Replace)
Removal
Remove the brake light switch (refer to procedure).
Caution: The brake light switch is a one time use
component. Ensure that a new switch is used during
reinstallation.
Remove the spring clip from the clevis pin.
Depress the brake
© 2019-2026 Copyright www.tesms.org
