Tesla Model S: Reservoir Assembly - Coolant (Remove and Replace)
Warning: If the 12V power supply is disconnected, do not attempt to open any doors with door glass in closed position. Failure to follow this instruction could result in door glass shatter.
Note: Before disconnecting the 12V power supply, ensure that the driver's door window is fully open. Failure to follow this instruction could result in vehicle lockout.
Removal
- Remove the LH front upper wheel arch liner (RH for RHD) (refer to procedure).
- Disconnect 12V power.
- Rear wheel drive (RWD): Refer to procedure.
- Dual Motor: Refer to procedure.
- Remove the underhood storage unit (refer to procedure).
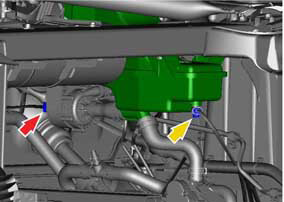
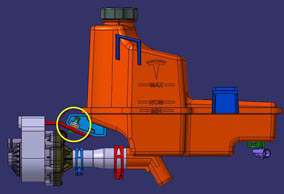
- Disconnect the harness connections (x2):
- Powertrain coolant pump connector (red arrow)
- Coolant level sensor connector (yellow arrow)
- Clamp the hose from the reservoir to the 4-way valve. Ensure
that the clamp is placed just below the spring clamp on the
reservoir.
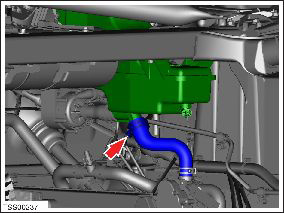
- From the LH wheelwell (RH for RHD), clamp the hose from the
powertrain coolant pump to the rocker hose. Ensure that the clamp is
placed just outside of the spring clamp.

- Remove the reservoir cap.
- Siphon the coolant from the reservoir into a container.
- For RHD vehicles: release the bolt that secures the coolant
reservoir upper bracket to the strut brace (torque 5 Nm).
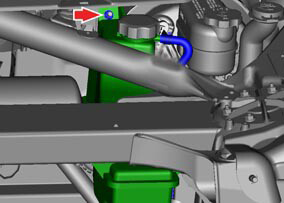
- Release the 1 nut that secures the coolant reservoir upper
bracket (torque 5 Nm).
- Release the bolts (x2) that secure the coolant reservoir to the
crossmember (torque 5 Nm).
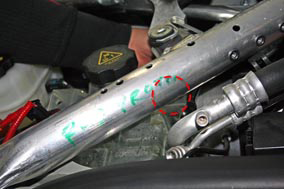
Note: RHD vehicles have a refrigerant pipe routed very close to these bolts. Use a long extension to remove the bolts.

- Release the 2 fasteners that secure the coolant reservoir bracket.
- Release the spring clamps (x2). Caution: Do not remove the clamps that were placed on the hoses in steps 5 and 6.
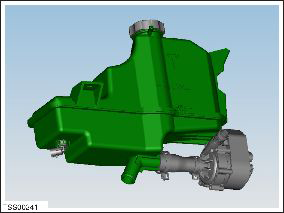
- Remove the coolant reservoir and powertrain coolant pump
assembly from the vehicle.
Caution: Plug the hoses to prevent ingress of moisture or dirt.
- For RHD vehicles, remove the bolt that secures the bracket to
the pump (torque 4 Nm).
- Position the reservoir and pump assembly over a container to catch any coolant that is spilled in the next step.
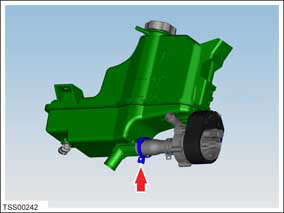
- Release the spring clamp that secures the hose to the coolant
pump assembly.
- Clean up any spilled coolant.
Installation procedure is the reverse of removal, except for the following:
- When all components have been reinstalled, refill and bleed the cooling system (refer to procedure).
READ NEXT:
 Reservoir Assembly - Coolant (Dual Motor) (Remove and Replace)
Warning: If the 12V power supply is disconnected, do
not attempt to open any doors with door glass in closed position.
Failure to follow this instruction could result in door glass
shat
Reservoir Cap - Coolant (Remove and Replace)
Removal
Remove the rear underhood apron (refer to procedure).
Remove the cap from the reservoir.
Installation
Ins
3 Way Coolant Valve - Chiller Bypass (Remove and Replace)
Warning: If the vehicle has air suspension, activate "Jack"
mode on the touchscreen before raising and supporting the vehicle.
Warning: If the 12V power supply is disconnected, do
not att
SEE MORE:
Tie Rod End - LH (Remove and Replace)
Warning: If the vehicle has air suspension, activate "Jack"
mode on the touchscreen before raising and supporting the vehicle.
Removal
Remove the road wheel (refer to procedure).
Loosen the tie rod end jam nut (torque 70 Nm).
Caution: To prevent ti
Charge Port - 3 Phase (Remove and Replace)
Note: This procedure describes how to remove and install
the 3 phase charge port. If the vehicle is equipped with a single
phase charge port, refer to procedure 44012202 (refer to procedure).
Warning: Only technicians who have been trained in High
Voltage Awareness are permitted to p
