Tesla Model S: Steering Rack (RWD) (Remove and Replace) - Installation
Tesla Model S (2012-2026) Service Manual / Steering / Steering Rack (RWD) (Remove and Replace) / Steering Rack (RWD) (Remove and Replace) - Installation
Installation
- Installation procedure is the reverse of removal, except for the following: Caution: Replace all nylon-insert locknuts. Caution: Replace all Patchbolt(s). Note: The LH and RH subframe braces are not interchangeable.
- Remove the protective caps from the tie rods of the new steering rack to ensure that there is no damage to the threads, then reinstall the protective caps.
- Turn the input shaft of the new steering rack completely clockwise.
- If the tie rod end positions were paint-marked earlier, transfer the paint marks to the new steering rack.
- Reinstall the steering rack.
- Install the subframe braces from the underhood area, but do not install the mounting bolts yet.
- Raise the vehicle.
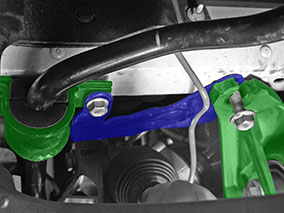
- Confirm the proper position of the subframe braces. The rear
portion of the brace is positioned between the subframe and side
rail, and the front portion is positioned between the bolt head and
the sway bar bracket.
- Loosely install the sway bar bolts and rear subframe bolts.
- Install the upper bolts (x2) that secure the LH and RH subframe
braces to the subframe (torque 26 Nm).
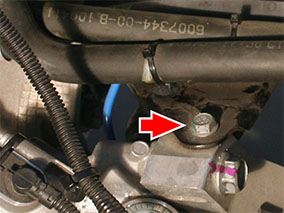
- Fully tighten the sway bar bolts and rear subframe bolts.
- Install the tie rod ends using the same number of turns that were recorded during removal.
- Ensure that the front road wheels are in a straight ahead position before reconnecting the lower intermediate shaft.
- Transfer the vehicle to a 4 post lift (refer to procedure).
- Perform a wheel alignment check (refer to procedure).
- Perform a full firmware update.
- Run the "Power Steering (EPAS) Control" procedure in Toolbox.
Note: After recalibrating the power steering, drive the vehicle for a minimum of 5 minutes before returning the vehicle to the customer.
READ NEXT:
 Steering Rack (Dual Motor) (Remove and Replace)
Warning: If the vehicle has air suspension, activate "Jack"
mode on the touchscreen before raising and supporting the vehicle.
Removal
Remove the front subframe (refer to procedu
Tie Rod End - LH (Remove and Replace)
Warning: If the vehicle has air suspension, activate "Jack"
mode on the touchscreen before raising and supporting the vehicle.
Removal
Remove the road wheel (refer to procedure).
Seal - Steering Rack (Remove and Replace)
Removal
Raise and support the vehicle (refer to procedure).
Warning: Do not work on an incorrectly supported
vehicle.
Remove upper intermediate stee
SEE MORE:
Replacing Tires and Wheels
Tires degrade over time due to the effects of ultraviolet
light, extreme temperatures, high loads, and
environmental conditions. It is recommended that tires
are replaced every six years, or sooner if required, even if
tread depth is above the minimum.
When a tire set becomes worn, replace all
IP Carrier (Remove and Replace)
Warning: If the 12V power supply is disconnected, do
not attempt to open any doors with door glass in closed position.
Failure to follow this instruction could result in door glass
shatter.
Note: Before disconnecting the 12V power supply,
ensure that the driver's door window
© 2019-2026 Copyright www.tesms.org
