Tesla Model S: Wind Deflector Arm - LH (Remove and Replace)
Tesla Model S (2012-2026) Service Manual / Roof / Wind Deflector Arm - LH (Remove and Replace)
Removal
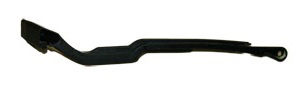
The wind deflector arm is part of an assembly that includes the wind deflector arm, wind deflector spring, and pivot block.

- Fully open the panoramic roof.
-
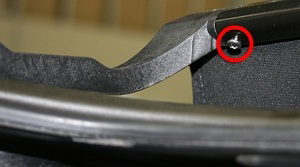
Release the screw that secures the wind
deflector arm to the wind deflector.
-
Release the deflector arm from the clip on the
deflector screen. Slide the arm outwards until it releases from the
deflector screen.

-
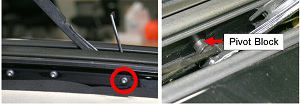
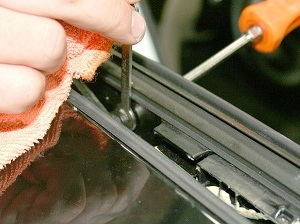
Use a thin wrench to hold the pivot block in
place. Release the screw that secures the deflector arm assembly to
the roof.
- Remove the deflector arm assembly from the vehicle.
-
Remove the deflector arm from the deflector arm
assembly.
Installation procedure is the reverse of removal.
READ NEXT:
 Wind Deflector (Remove and Replace)
Removal
Remove the LH and RH wind deflector arms
(refer to procedure).
Release the wind deflector from the clips on
the deflector blade.
Motor - Sunroof - LH (Remove and Replace)
Removal
If the vehicle is equipped with premium audio,
remove the premium boost amplifier module
(refer to procedure).
Disconnect the sunroof motor harness connector.
Motor - Sunroof - RH (Remove and Replace)
Removal
Remove glove box assembly
(refer to procedure)
Disconnect sunroof motor harness connector.
Remove screws (x3) securing sunroof motor to
'A' post (torque
SEE MORE:
Wire Harnesses
RST-182-F
Tesla part number:
1013716-00-A
Description:
TOOL, HARNESS, 4-WAY BREAKOUT
Model:
Roadster, Model S
Status:
Distribu
2nd Row Center Console Assembly (Remove and Replace)
Removal
Fold the RH 2nd row back rest.
Loosen the 2nd row center console tether strap behind the center
seat.
Unclip the tether latch from the child seat anchor.
Pull the tether out between the seat and the back re
© 2019-2026 Copyright www.tesms.org
